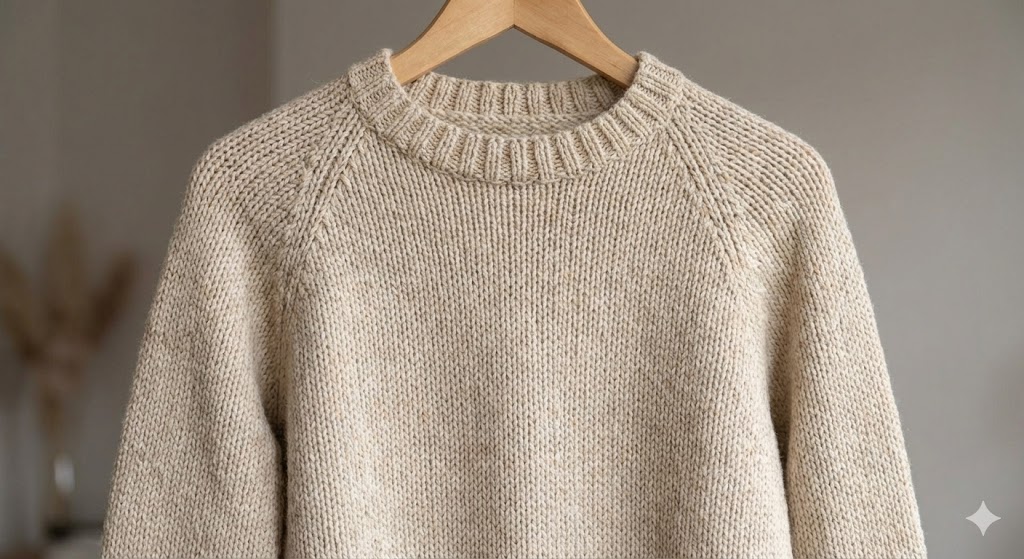
Learning how to block a knitted sweater can transform your hand-knit project from homemade to polished. When you know how to block a knitted sweater, the fibers relax and settle into their ideal shape. Research shows that knowing how to block a knitted sweater helps it last longer and fit better. Blocking sets the stitches, evens out the tension, and smooths the texture. By mastering how to block a knitted sweater, you prevent it from getting stretched or misshaped. Your favorite sweater will keep its shape for years. With the right tools and easy tutorials, anyone can learn how to block a knitted sweater. This guide will help you feel confident about each step.
Key Takeaways
-
Blocking a knitted sweater makes it look better and helps it keep its shape for a long time. This step helps your project look neat and like it was made by a pro.
-
Use the right tools for blocking, like blocking mats, T-pins, and measuring tools. These things help you get straight edges and the right size.
-
Get your sweater ready before blocking by looking for loose ends and reading fiber labels. This helps you pick the right blocking method for your yarn.
-
Pick the best blocking method for your yarn. Wet blocking works well for wool. Steam blocking is good for cotton and soft yarns.
-
Let your sweater dry all the way after blocking. This is important for keeping its shape and stopping it from changing form.
What is blocking?
Blocking defined
Blocking is a special step that helps your knitted sweater look its best. You use heat and moisture to adjust the shape and size of your finished piece. Textile experts say blocking is the final stage in handmade textile production. You set the stitches and standardize the final dimensions. Blocking works for lace, sweaters, socks, and other projects. When you block your sweater, you help the fabric relax and drape nicely. You can see the difference right away. Blocking makes your sweater look smooth and professional.
You might wonder why blocking is so important. When you finish knitting, your sweater may look a little uneven or have curled edges. Blocking fixes these problems. You use water or steam to help the yarn bloom and settle. Blocking lets you stretch and shape your sweater to the right size. You get a neat, even look that feels great to wear.
Why blocking matters
Blocking does more than just make your sweater look good. It helps your project last longer and keeps its shape. Take a look at the main benefits of blocking:
|
Benefit Description |
|---|
|
Achieves correct size and shape by stretching and reshaping the knitted piece. |
|
Sets stitches for a polished and even fabric, smoothing out inconsistencies. |
|
Softens fabric and improves drape, allowing yarns to relax and bloom. |
|
Flattens curled edges, ensuring the fabric lies flat and looks symmetrical. |
|
Enhances lace or textured patterns, revealing intricate designs and details. |
|
Maintains shape and integrity over time, resisting stretching and shrinking. |
You can see how blocking helps every part of your sweater. You get smooth stitches, flat edges, and a sweater that keeps its shape. Blocking makes your hard work stand out. If you want your sweater to look and feel amazing, blocking is the key.
Tools for blocking

Getting the right tools for blocking makes your sweater look neat and professional. You don’t need fancy gadgets, but a few simple items can help you get perfect results every time.
Blocking mats and pins
You want a surface that holds your sweater in place while you block it. Blocking mats give you a safe spot to work. Foam mats work best because they hold pins well and last a long time. Mats should fit your project and workspace. Look for lightly textured mats so your sweater doesn’t slip. If you use mats with grid lines, you can line up your edges and keep everything straight. Heat-resistant mats help if you use steam blocking.
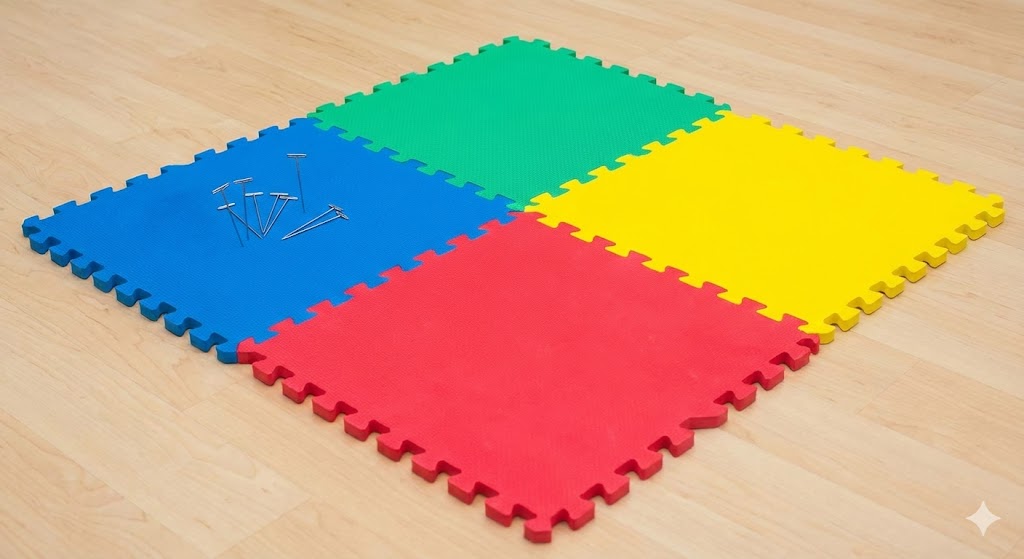
Here’s a quick look at popular blocking mats:
|
Blocking Mat |
Pros |
Cons |
|---|---|---|
|
GBtroo Blockers |
Robust, reusable, moisture-resistant |
Grids may be slightly off |
|
Yiitoll Blocking Mats |
Interlock seamlessly, heat resistant |
Initial odor, limited tiles |
You also need pins. Rust-proof pins keep your sweater safe. T-pins work well because they hold the fabric tight without slipping.
-
Mats should fit your project size.
-
Grid lines help with alignment.
-
Heat resistance is key for steam blocking.
Wires and measuring tools
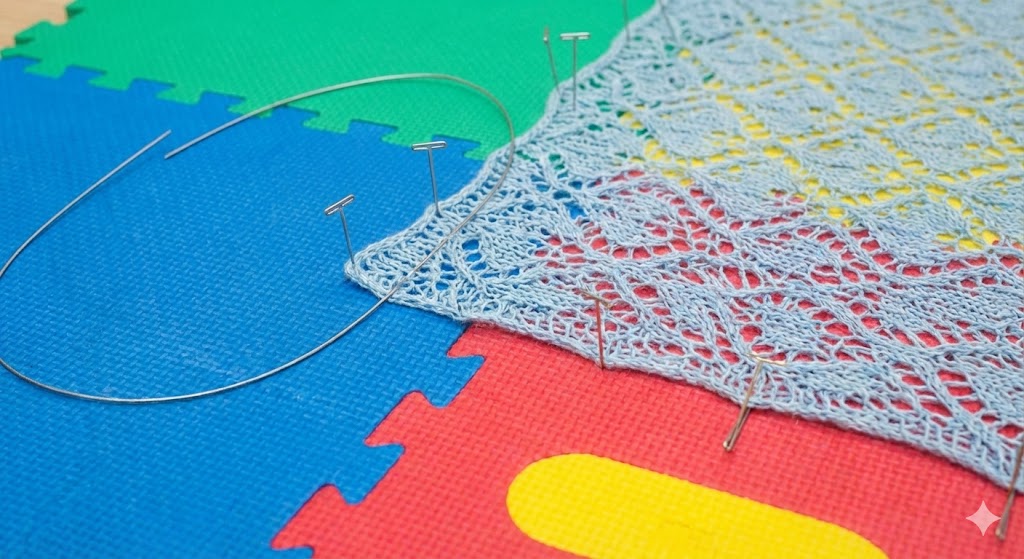
Blocking wires help you shape edges and keep them straight. You slide wires through the edges of your sweater before pinning. Thin, flexible wires work for curved edges. Sturdy wires help with straight lines. Measuring tapes and rulers help you check the size as you block.
|
Type of Wire |
Description |
|---|---|
|
Thin and flexible |
Ideal for shorter curved edges |
|
Sturdy |
Works well along straight edges |
Blocking wires smooth out stitches, adjust the finished size, and highlight patterns. You get even edges, which makes seaming easier. Measuring tools help you keep your sweater the right size.
Water, towels, spray bottles

Water is the secret to relaxing sweater fibers during blocking. You soak or dampen your sweater to help it take shape. Towels press out extra water so your sweater doesn’t get too wet. Spray bottles let you add moisture gently, which helps with shaping and prevents over-relaxation.
-
Water relaxes fibers for shaping.
-
Towels remove excess water.
-
Spray bottles offer gentle, controlled dampening.
With these tools for blocking, you can shape your sweater, smooth out stitches, and get a finish that looks store-bought. Blocking isn’t hard when you have the right setup.
Sweater prep for blocking
Getting your sweater ready for blocking is a big step toward a perfect finish. You want to make sure every detail is in place before you start. Let’s walk through the main things you should check.
Check loose ends
Before you begin blocking, look for any loose yarn ends. You might find them at the cuffs, neckline, or seams. Weaving in these ends keeps your sweater neat and prevents unraveling. If you skip this step, the blocking process can pull out loose threads and mess up your hard work. Take a few minutes to tuck in every end. You’ll thank yourself later!
Read fiber labels
Fiber labels tell you how to treat your sweater during blocking. You need to know what kind of yarn you used. Wool, cotton, and alpaca all react differently to moisture and heat. Here’s what you should look for:
-
Wool and alpaca sweaters do best with spray or steam blocking. These fibers like gentle moisture and heat.
-
Cotton and linen sweaters respond well to wet blocking. They need a good soak to relax and shape.
-
Some blends may need special care. Always check the label for washing and blocking instructions.
Reading the label helps you choose the right blocking method. You protect your sweater and get the best results.
Measure before blocking
You want your sweater to fit just right after blocking. Grab a measuring tape and check the size before you start. Compare your sweater to the pattern schematic. This helps you know how much to stretch or shape during blocking. Here’s a simple checklist:
-
Review your pattern schematic. This guides your blocking process.
-
Soak your sweater pieces in lukewarm water for about 20 minutes. You can use a no-rinse fiber wash if you like.
-
Lift the pieces out gently and let the water drain. Roll them in a towel to remove extra moisture.
-
Lay the damp pieces on a blocking mat. Use your measurements to shape each part evenly.
Tip: Measuring before blocking helps you avoid overstretching and keeps your sweater looking professional.
When you prep your sweater for blocking, you set yourself up for success. You get a smooth, even finish that shows off your stitches and keeps your sweater in great shape.
Blocking methods explained
You have a few blocking techniques to choose from, and each one works best for certain yarns and projects. Let’s break down the main methods so you can pick the right one for your knitted sweater.
Wet blocking for natural fibers
Wet blocking is the classic choice for sturdy yarns like wool and linen. You soak your sweater in cool water, then gently squeeze out the extra moisture. This method helps soften the fibers and lets you shape your project with ease. Wet blocking via soaking works well if your sweater has been exposed to dirt or pet hair, since it gives the whole piece a fresh start. Wool responds especially well, and you’ll see your stitches bloom and even out.
Tip: Always use a towel to blot out water before you pin your sweater to the blocking mat.
Steam blocking for delicate yarns
Steam blocking is perfect for cotton and some synthetic yarns. Cotton can get weak when wet, so steam helps you control the shape without risking damage. You pin your sweater to the board, then hover an iron set to high heat above the fabric. The steam relaxes the stitches and sets the shape. Steam blocking also works for hand-dyed wool, but you need to watch for color bleeding. Synthetic yarns can be tricky, so test a small area first.
Spray blocking basics
Spray blocking is gentle and works best for delicate fibers like silk and cashmere. You lay your sweater flat, pin it in place, and mist it lightly with water. This method prevents damage to fragile yarns and keeps their unique texture. Spray blocking is quick and easy, making it a good choice for lightweight projects.
Choosing the right method
Picking the best blocking method depends on your yarn and project. Here’s a quick guide:
|
Blocking Method |
Best For |
Notes |
|---|---|---|
|
Wet blocking |
Wool, linen |
Deep clean and reshape; great for sturdy fibers. |
|
Steam blocking |
Cotton, synthetics |
Fast and controlled; good for finishing details. |
|
Spray blocking |
Silk, cashmere |
Gentle; protects delicate fibers and textures. |
Try different blocking methods to see what works for you. Your sweater will look and feel better when you match the technique to the fiber.
How to block a knitted sweater step-by-step
Ready to learn how to block a knitted sweater for perfect results? You’re about to see how easy it is to turn your knitting projects into professional-looking pieces. Follow these steps for blocking, and you’ll get a sweater that fits, feels, and looks amazing.
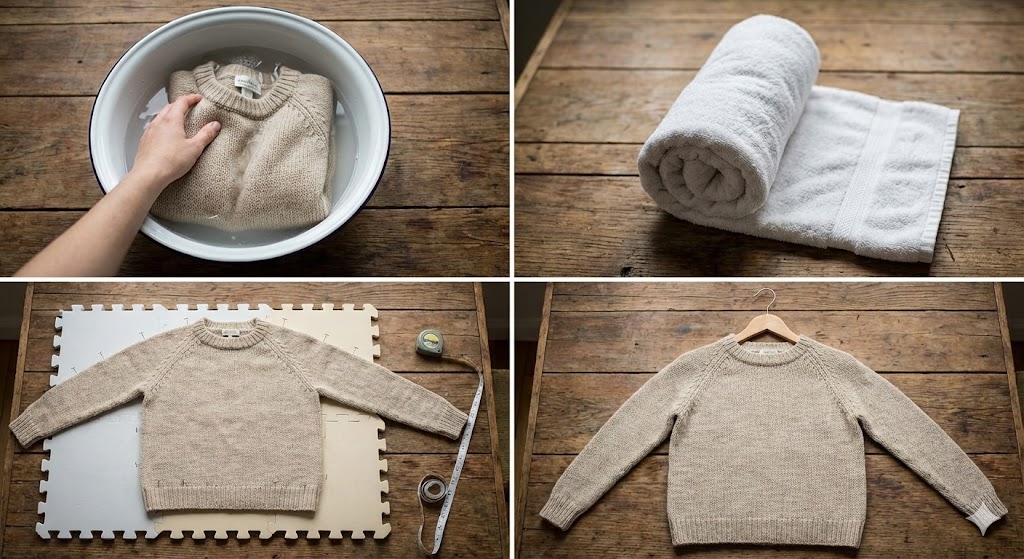
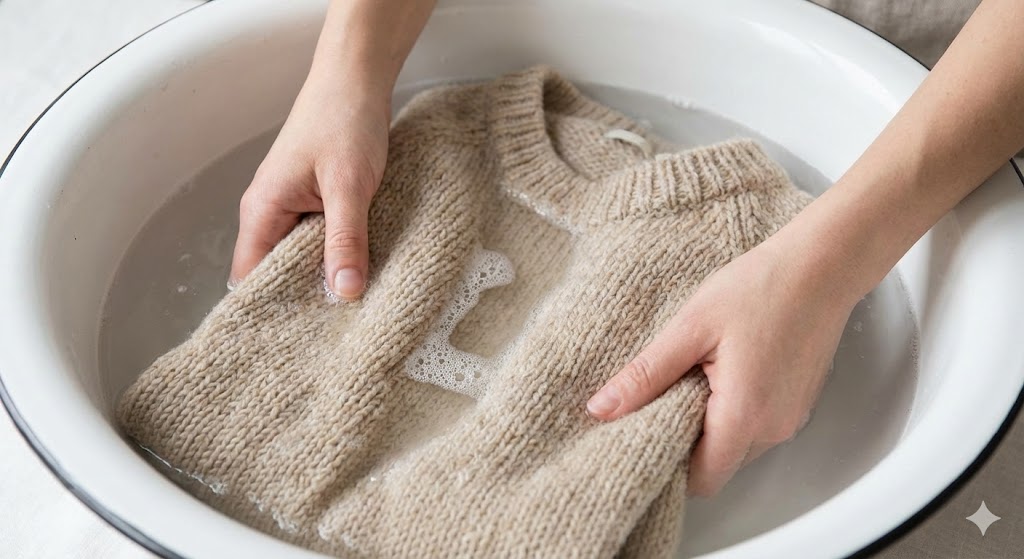
Soak and remove water
You want your sweater to relax before shaping. Here’s how to block a knitted sweater with soaking:
-
Fill a basin or sink with tepid water. Add a tablespoon of gentle soap for every gallon of water.
-
Submerge your knit sweater. Let it soak for at least 15 minutes. This helps the fibers open up and settle.
-
Fold your sweater gently. Squeeze out extra water without twisting or wringing. Twisting can stretch or damage the stitches.
-
Lay a clean towel flat. Place your sweater on top. Roll the towel up with the sweater inside.
-
Press down on the rolled towel. This helps the towel absorb more water. You don’t need to twist.
-
Move your sweater to another dry towel. Shape it a little with your hands.
-
Let your sweater air dry until it’s just damp, not soaking wet.
Tip: Always handle your sweater gently. Rough treatment can stretch or misshape your knitting projects.
Shape and pin
Now you get to shape your sweater and set its final size. This step is key for blocking knitting and making sure your sweater matches your pattern.
-
Spread your damp sweater on blocking mats. Use your hands to adjust the shape. Smooth out the fabric and line up the edges.
-
For straight edges, slide blocking wires through the selvedge stitches. Wires help keep the lines crisp and even.
-
Insert T-pins along the inside of each wire. Stretch the sweater gently to match the finished measurements from your pattern.
-
For curved edges, use pins at regular intervals. This keeps the curves smooth and prevents puckering.
-
If you have a circular yoke or shawl, start by pinning the four compass points. Add more pins around the edge for even tension.
-
Double-check the measurements. Use a ruler or measuring tape to make sure your sweater matches the pattern.
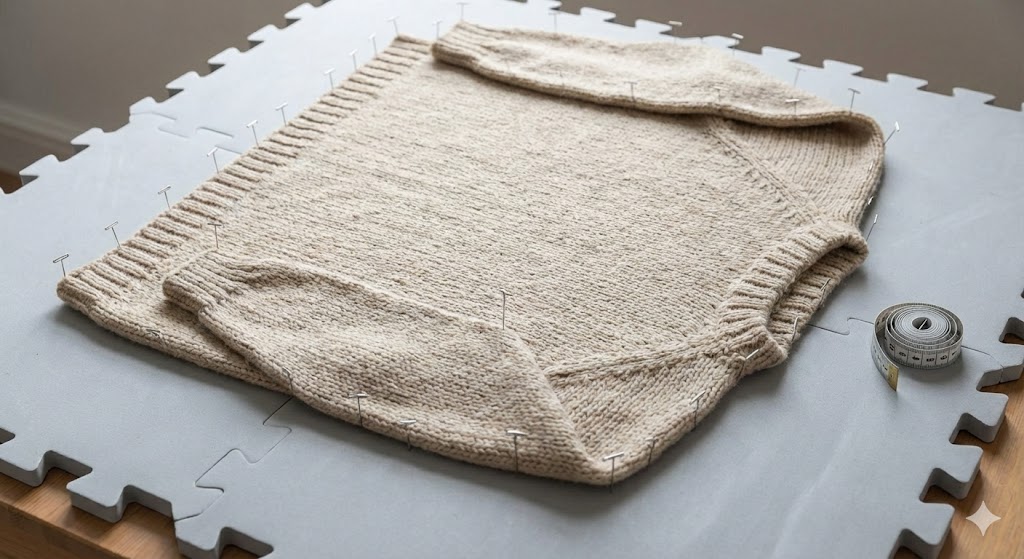
Note: Pinning is the secret to how to block a knitted sweater for perfect results. Pins and wires hold the shape while the sweater dries. You get crisp edges and smooth seams.
|
Tool |
Use Case |
Why It Matters |
|---|---|---|
|
Blocking mats |
Surface for shaping |
Prevents slipping |
|
T-pins |
Hold edges and seams |
Keeps shape secure |
|
Blocking wires |
Straighten edges |
Smooths out stitches |
|
Measuring tape |
Check dimensions |
Ensures perfect fit |
Dry and finish
Drying is the last step in how to block a knitted sweater. You want your sweater to dry completely before wearing or storing it.
-
Drying time depends on your environment. Direct sunlight can dry your sweater in a few hours. A damp room may take several days.
-
Place your blocking station near a radiator or heater to speed up drying. A dehumidifier can help your sweater dry within 24 hours.
-
You can use a hair dryer on medium heat for a quick finish. Keep the dryer moving so you don’t overheat one spot.
-
Outdoor drying works well if you have a portable blocking setup. Make sure your sweater is safe from wind and pets.
Tip: Never rush the drying process. If your sweater isn’t fully dry, it can lose its shape or develop odors. Patience pays off with blocking knitting projects.
Once your sweater is dry, remove the pins and wires. Try it on and admire your work! You’ve learned how to block a knitted sweater, and your knitting projects will look better than ever.
Callout: Blocking isn’t just for sweaters. You can use these steps for scarves, shawls, and other knitting projects. The right blocking method makes every piece look its best.
Common mistakes to avoid
When you start blocking your sweater, you want to get the best results. Sometimes, small mistakes can ruin your hard work. Let’s look at the most common errors and how you can avoid them.
Overstretching
You might think pulling your sweater tight will make it look better. In reality, overstretching during blocking can distort the design and structure. If you stretch cabling or lace too much, the pattern may change and never go back to its original shape. Always stretch gently. Use your hands to shape the sweater, but stop if you feel resistance. You want the stitches to relax, not to break.
Wrong method for fiber
Choosing the wrong blocking method for your yarn can cause problems. Every fiber reacts differently. If you use a method that doesn’t match your yarn, you might see long-term effects like shrinking or felting. Always check the care label before you start. Wool likes wet blocking, while cotton and synthetics prefer steam. Silk and cashmere need gentle spray blocking. Using the right method keeps your sweater safe and looking great.
-
Common mistakes include:
-
Pinning through delicate areas
Skipping prep
You may want to jump straight into blocking, but skipping prep is a big mistake. Experts say that prepping your sweater helps you spot problems early. If you skip this step, you might end up with a sweater that fits wrong or has uneven stitches.
“Pre-blocking allows us to find out quickly that the project is going in the wrong direction and saves a lot of time and negative emotions.”
“After the final blocking, you may find out that these lace patterns have ‘opened’ too much, the texture does not match the yarn and the finished garment is two sizes larger than you planned.”
Take time to weave in loose ends and measure your sweater before blocking. This step works for both knitting and crochet projects.
Not drying fully
If you remove pins before your sweater is dry, it can lose its shape. Skipping drying time is a common mistake. Always wait until your sweater is completely dry before you finish blocking. This helps your stitches set and keeps your sweater looking fresh. Whether you knit or crochet, patience pays off.
Tip: Place your sweater in a warm, dry spot and check it every few hours. Don’t rush the process.
Blocking helps your sweater look professional. Avoid these mistakes and you’ll love the results, whether you knit or crochet.
Tips for perfect blocking
Expert advice
You want your knitted sweater and crochet projects to look like professional garments. Blocking helps you get there. Here are some expert tips you can use every time you block your work:
-
Gather your equipment before you start. You need T-pins, a blocking mat, and a spray bottle or basin.
-
Dampen your knitting or crochet projects by soaking them in warm water for about 15 to 20 minutes. This step helps the fibers relax and improves the drape.
-
Lay your garments flat on the blocking mat. Shape them to match your pattern’s measurements.
-
Secure the edges and corners with T-pins. This keeps your garments in place while blocking.
-
Let your sweater or crochet projects dry completely. Air drying for 24 to 48 hours gives you the best results.
Tip: Always block your garments flat. This keeps the shape even and helps the drape look smooth.
Troubleshooting
Sometimes blocking doesn’t go as planned. You might see uneven edges or puckering in your garments. Here are some ways to fix these problems:
-
Keep your fabric stable while blocking. This stops it from moving around.
-
Make sure your project is stretched evenly. Use T-pins to hold the edges and corners.
-
Adjust the tension if you see puckering. You want the stitches to relax, not pull tight.
-
Trim any extra yarn close to the edges, but don’t cut into the stitches.
-
Use a fusible web to seal edges if they curl up. This helps your garments stay flat.
-
Check your tools. Make sure your blocking mat and pins work well for your favorite blocking technique.
Note: If you block crochet projects, pay extra attention to the edges. They can curl more than knitted garments.
Enhancing stitch definition
Blocking does more than shape your garments. It makes your stitches pop and gives your sweater a clean look. You can use these tricks for improving the drape and stitch definition:
-
Use blocking wires for straight edges. This keeps the stitches even and helps the drape look natural.
-
Mist your garments lightly with water if you want a softer finish.
-
Pin out lace or textured areas to open up the pattern. This works for both sweaters and crochet projects.
-
Let your garments dry fully before removing pins. This sets the stitches and keeps the drape smooth.
|
Blocking Tip |
Result for Garments |
|---|---|
|
Use wires for edges |
Crisp lines and smooth drape |
|
Mist with water |
Softer, relaxed drape |
|
Pin lace areas |
Open, defined stitches |
Callout: Try different blocking methods until you find your favorite blocking technique. Every project is unique, and blocking helps your garments look their best.
Caring for your blocked sweater
Storing shape
You want your sweater to keep its perfect shape after blocking. Always make sure your sweater is completely dry before you remove any pins or wires. If you fold your sweater neatly, you help the blocked fabric stay crisp. Wool sweaters hold their shape for months when you store them with care. You can use a ventilated hamper or wrap your sweater in acid-free tissue paper. Avoid sealed plastic bags because animal fibers need to breathe. If you store your sweater clean, you keep pests away and protect your hard work.
Best storage tips:
-
Fold your sweater gently after blocking.
-
Use breathable containers or tissue paper.
-
Keep your sweater dry and clean.
Tip: Never hang a blocked sweater. Hanging can stretch out the shoulders and ruin the shape.
Washing and re-blocking
You don’t need to wash your blocked sweater often. Only wash it when you see dirt or smell odors. Over-washing can wear out the fabric and make it lose its shape. After washing, blocking helps your sweater look fresh and fit well again. You can use the same blocking steps for sweaters and blocking crochet projects. Always re-block after each wash to keep the shape and stitch definition.
Washing and blocking checklist:
-
Wash only when needed.
-
Use gentle soap and cool water.
Note: Blocking crochet sweaters after washing helps them keep their beautiful patterns.
Long-term care
Long-term care keeps your blocked sweater looking new. Clean your sweater before you store it. This stops pests from finding it. Choose a ventilated hamper or acid-free tissue paper for storage. Never use zippered bags or sealed plastic. Animal fibers need air to stay healthy. If you have stains, tell your dry cleaner. Pick a specialty cleaner who uses safe fluids and pre-spots stains. Blocking can fix sweaters that lose their shape over time. You can adjust the size and make your sweater look great again. Blocking crochet projects also benefit from these care steps.
Long-term care tips:
-
Store clean sweaters in breathable containers.
-
Ask your dry cleaner for advice on special garments.
-
Re-block if your sweater gets misshapen.
Callout: Blocking isn’t just a one-time step. You can use blocking and blocking crochet techniques to refresh your favorite sweaters for years.
You now know how blocking can turn your sweater into a polished, professional piece. When you block, you help stitches settle, open up patterns, and fix small flaws.
-
Blocking gives your sweater a crisp look and a soft, even feel.
-
It helps your sweater keep its shape and last longer.
-
Regular blocking stops edges from rolling and makes your work shine.
As Evelyn Clark says, “Blocking is the simple process that brings out its beauty.” Try these steps on your next project and see the difference!
FAQ
How often should you block your sweater?
You only need to block your sweater after finishing it or after each wash. If your sweater loses its shape, blocking helps bring it back. You don’t have to block after every wear.
Can you block acrylic yarn sweaters?
Yes, you can block acrylic sweaters, but use steam instead of soaking. Hold the steam above the fabric and never touch it with the iron. Acrylic fibers set with heat, so be gentle.
What if your sweater shrinks during blocking?
Don’t panic! Lay the sweater flat and gently stretch it back to the right size while it’s damp. Use pins to hold the shape. Let it dry completely before removing the pins.
Do you need special soap for blocking?
You don’t need fancy soap. A gentle, no-rinse wool wash works best. Mild baby shampoo also does the trick. Avoid harsh detergents because they can damage the fibers.
Can you speed up the drying process?
You can place your sweater near a fan or open window. Never use direct heat or a dryer. Quick drying can cause shrinking or misshaping. Patience gives you the best results.