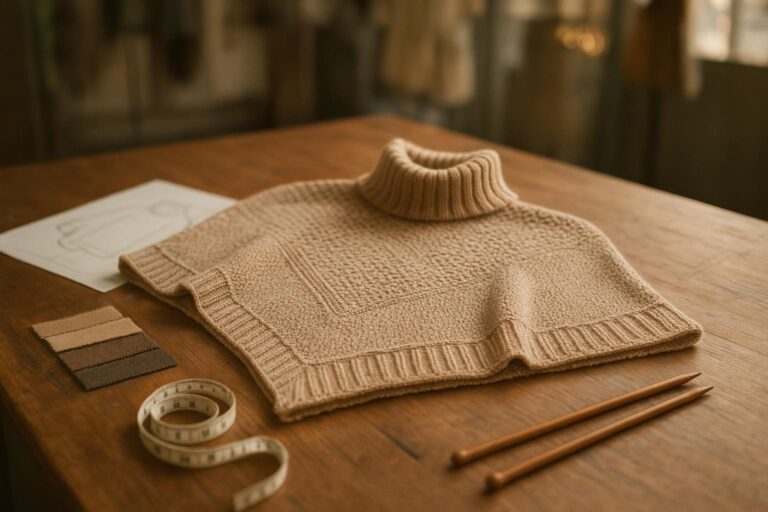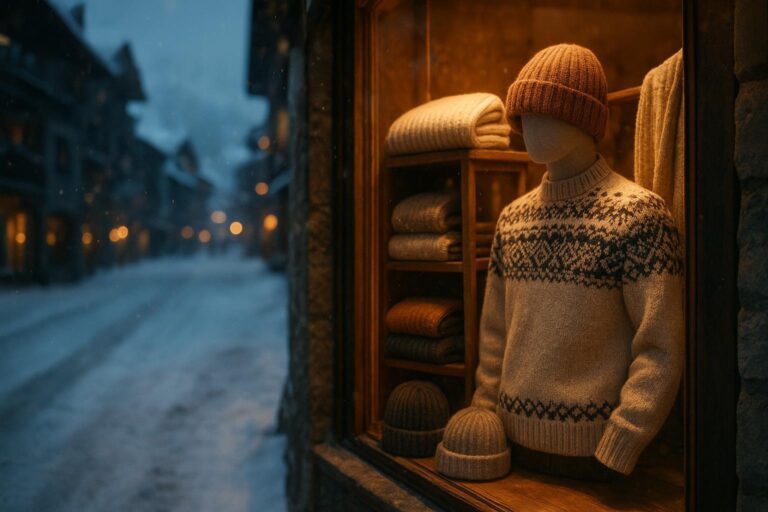
You probably notice how a sweater fits your shoulders and arms right away. That feeling comes from how the shoulder and sleeve are made. Knitwear anatomy shapes every sweater you make or wear. When you know about knitwear anatomy, you can see why one sweater fits well and another feels too tight or loose. Designers use knitwear anatomy to make different sweater styles, like set-in, drop, raglan, yoke, or saddle shoulders. Each way changes how your sweater looks and feels. Sizing charts for knitwear anatomy have nine points of measurement to help you change a sweater for your body. Studies show that knowing knitwear anatomy helps you change a sweater pattern so it fits better. Many knitters find that sweaters do not fit because the knitwear anatomy does not match their own measurements.
|
Evidence |
Explanation |
|---|---|
|
Sizing charts include nine different points of measurement |
This detailed method helps knitters make exact changes for a better fit. |
|
Anthropometric studies show correlations between body measurements |
Knowing these links helps people make smart changes to patterns. |
|
Sizing charts are based on specific body proportions |
Seeing that patterns may not fit everyone helps knitters change designs for better results. |
Key Takeaways
-
Knowing knitwear anatomy helps you pick the best shoulder style. This gives you a better fit and more comfort. – There are many shoulder styles, like set-in and drop shoulder. These change how a sweater looks and feels. Try different ones to see which you like best. – Sizing charts have nine measurement points. Use them to change patterns for a fit that matches your body. – Seamless methods give a smooth finish. Seamed methods make your knitting stronger. Try both in your projects. – There are many sleeve styles, like balloon or puff sleeves. These can make your sweaters look special.
Knitwear Anatomy Basics
What Is Knitwear Anatomy?
When you start knitting, you quickly learn that every sweater has a structure. Knitwear anatomy means the parts that make up a sweater and how they fit together. You use this knowledge to shape your projects and make them fit well. The main components include body shape, construction techniques, shaping methods, yarn selection, and measurements. Each part plays a role in how your sweater feels and looks.
Here is a quick overview of the main components:
|
Component |
Description |
|---|---|
|
Body Shape and Proportion |
You match the garment to your body for comfort and function. |
|
You choose methods like top-down or bottom-up, and decide on seamed or seamless knitting. |
|
|
Shaping Methods |
You use increases, decreases, and short rows to create the right shape. |
|
Yarn Selection |
You pick yarn based on fiber and weight, which changes the drape and structure. |
|
Measurements and Fit |
You measure carefully to make sure your sweater fits your body. |
You use these building blocks every time you start a new knitting project. When you understand knitwear anatomy, you can change patterns to fit your own style and body. You also learn how different shoulder constructions affect the final look and comfort of your sweater.
Why Shoulder Construction Matters
Shoulders are one of the most important parts of any sweater. The way you shape the shoulders changes how the sweater sits on your body. You see the difference right away when you try on a sweater with different shoulder constructions. Some styles, like a European shoulder, give a smooth line from the neckline to the sleeve. This makes your sweater look neat and professional. Other shoulder constructions add a relaxed or casual feel.
-
You get a better fit when you choose the right shoulder construction for your body.
-
You make your sweater last longer because strong shoulder constructions add durability.
-
You show off your knitting skills with polished shoulders and clean lines.
When you plan your next knitting project, think about how the shoulders will look and feel. You can use your knowledge of shoulder constructions to make sweaters that fit well and last a long time. Every time you pick up your needles, you use knitwear anatomy to guide your choices.
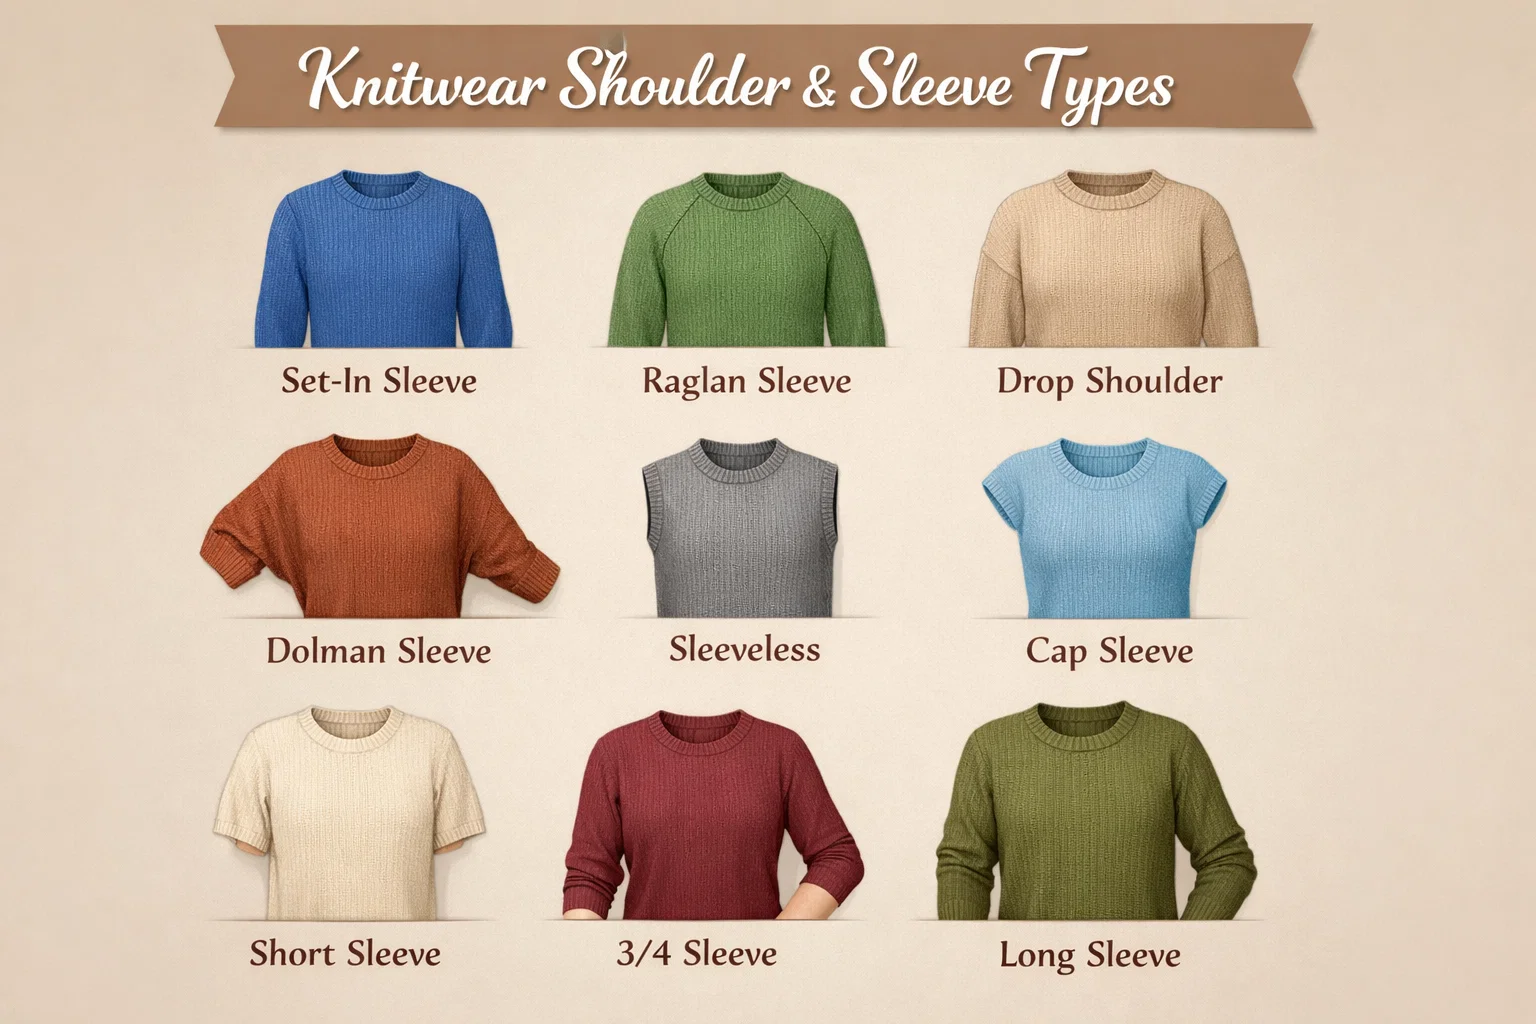
Types of Shoulder Constructions
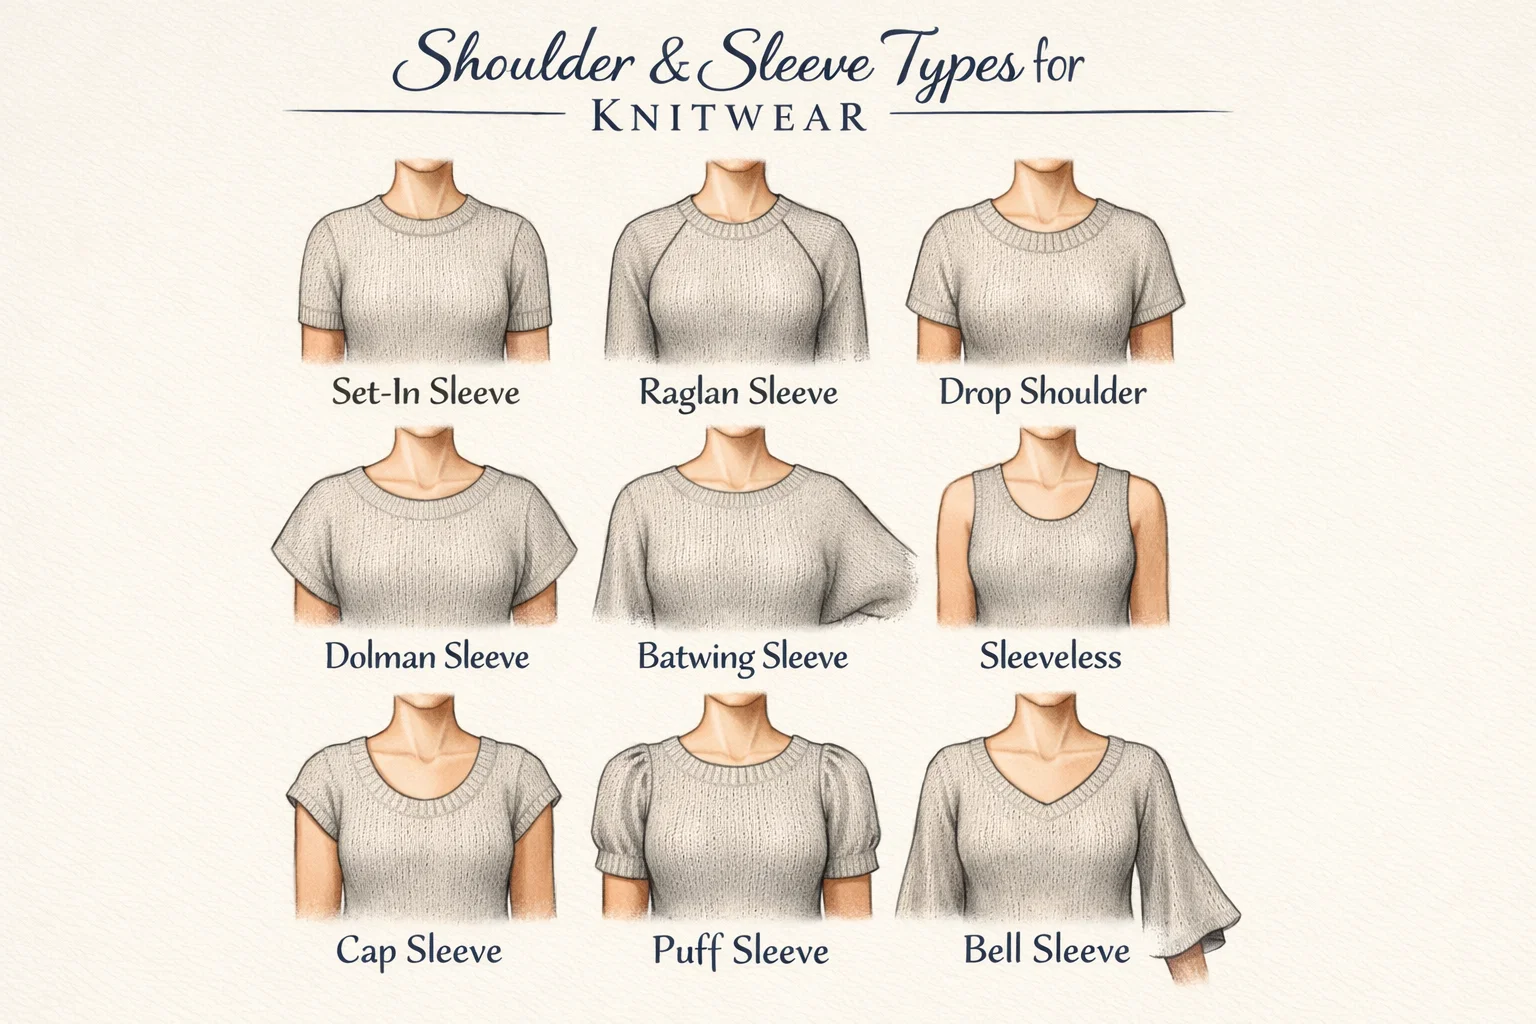
When you knit a sweater, the shoulder construction shapes how it fits and looks. Each type changes the style, comfort, and how easy it is to knit. You can choose from several main types. The most common are set-in sleeve, drop shoulder, saddle shoulder, raglan shoulder, circular yoke, and full-fashioned shoulder. You can compare their features in the table below:
|
Shoulder Type |
Description |
Purpose |
|---|---|---|
|
Set-In Sleeve |
Features armhole shaping with curved sleeves that fit neatly when seamed. |
Provides a structured fit, allowing shoulder seams to sit naturally at the peak of the shoulder. |
|
Drop Shoulder |
Simple construction with little or no armhole shaping; shoulder seam is below the natural shoulder line. |
Easy to make, ideal for textured or lace patterns, giving a casual feel to garments. |
|
Saddle Shoulder |
Includes an elongated panel that extends along the top of the front and back panels. |
Offers a modern, structured look with extra space around the shoulders. |
|
Raglan Shoulder |
Straight seams run from the neckline to the underarm, allowing for a roomy fit. |
Provides a great range of movement and can feature decorative elements. |
|
Circular Yoke |
Shaping is done around the yoke, allowing for seamless designs. |
Excellent for decorative yokes, minimizing seams for comfort, especially for sensitive skin. |
|
Aligns with the bone structure of the shoulder for support and stability. |
Anchors the sweater and prevents stretching or sagging at the shoulder. |
Tip: The shoulder construction you pick will change how your sweater fits your body and how easy it is to knit. Try different types to see which one you like best. Check Balloon sleeve style for cardigan
Set-In Shoulder
The set-in sleeve is the most classic and tailored shoulder construction. You shape the upper body with a square outline and add a rounded sleeve cap. This method lets the sleeve fit closely to your shoulder, following the body’s natural curves. You often see set-in sleeve in both casual and formal sweaters.
-
The set-in sleeve gives you a neat, professional look.
-
You can adjust the cross front, upper chest, and upper arm for a custom fit.
-
This construction works well if you want a sweater that sits right at the top of your shoulder.
You may notice some fit issues with set-in sleeve. Sometimes, you see ripples along the seam or a pointy shoulder if the shape does not match your body. You can fix these by changing the size or adding padding. If you see divots at the armhole, try a larger size. The set-in sleeve can be tricky to knit because you need to shape the armhole and sleeve cap carefully. You often sew the pieces together at the end.
Note: The set-in sleeve is not the best choice for oversized sweaters. It works best with little or no extra room in the fit.
Drop Shoulder
The drop shoulder is simple and relaxed. You knit the body as a rectangle, and the shoulder seam sits below your natural shoulder line. The sleeves taper toward the wrist and attach to the straight edge of the body. This style gives you a boxy, loose fit.
-
Drop shoulder sweaters feel comfortable and easy to wear.
-
The straight, low shoulder line creates a casual look.
-
You can use this construction for textured or lace patterns.
You may find that drop shoulder sweaters look bulky, especially if you have a broad upper body. The extra fabric under the arms can make the sweater feel roomy but less tailored. This style works well for oversized sweaters and cozy pullovers.
Tip: If you want a sweater that is easy to knit and forgiving in fit, try the drop shoulder.
Saddle Shoulder Construction
The saddle shoulder uses a unique band that runs along the top of the shoulder, connecting the front and back. You knit this band as part of the sleeve, so the seam sits parallel to your shoulder. This method gives you a modern, structured look with more space around the shoulders.
-
The saddle shoulder creates a gentle slope, not as steep as a raglan.
-
You need to use special short rows and decreases, which makes this construction more complex.
-
The saddle shoulder works well if you want a sweater that combines structure with comfort.
You may find saddle shoulder harder to knit than raglan or drop shoulder. The shaping takes more planning, but the result is a sweater that fits well and looks sharp.
Raglan Shoulder
The raglan shoulder has seams that run from the neckline to the underarm. You increase stitches along these lines to shape the body and sleeves. This construction gives you a seamless look and a relaxed fit.
-
Raglan sleeves let you move your arms easily.
-
You can knit the sweater in one piece, which means fewer seams.
-
Raglan shaping works for many body types and styles.
You use stitch markers to keep track of the increases. You can add neck shaping with short rows for a better fit. Blocking your finished sweater helps the raglan lines look smooth.
Tip: Raglan sleeves are easier to knit than set-in sleeve or saddle shoulder. They are a good choice for your first sweater project.
Circular Yoke
The circular yoke construction shapes the sweater with increases spaced evenly around the neckline. You knit the body and sleeves together in one piece, so you do not have to sew seams. The circular yoke gives you a smooth, round shape at the shoulders.
-
The circular yoke is perfect for colorwork or decorative patterns.
-
You get a seamless transition from the body to the sleeves.
-
This style feels comfortable, especially if you have sensitive skin.
The circular yoke does not create a tailored fit. The armholes and shoulders blend together, so the sweater feels loose. You can use decorative increases to add interest to the yoke. The circular yoke is a favorite for knitters who want to show off their skills with color and texture.
Note: If you want a sweater with a soft, round shape and no seams, try the circular yoke.
Full-Fashioned Shoulder
The full-fashioned shoulder lines up with your shoulder bones. The seam sits on top of the scapular spine, which gives your sweater extra support. This construction helps the sweater keep its shape and prevents stretching.
-
The full-fashioned shoulder works well for sweaters that need to last a long time.
-
You get a stable, anchored fit at the shoulders.
-
This method is different from other types because it follows the natural slope of your shoulder.
You may choose the full-fashioned shoulder if you want a sweater that holds up to lots of wear. It is a good choice for classic, structured designs.
Tip: Try the full-fashioned shoulder if you want a sweater that will not sag or lose its shape over time.
You can see that each shoulder construction changes the fit, style, and knitting process. The set-in sleeve gives you a tailored look, while the drop shoulder feels relaxed. The saddle shoulder adds structure, the raglan shoulder offers movement, and the circular yoke lets you play with color and design. The full-fashioned shoulder gives you support and durability. When you know these types, you can pick the best one for your next sweater.
Set-In Shoulder Details
Features and Fit
Set-in shoulders give your sweater a classic and polished look. You see the shoulder seam sit right at the top of your shoulder, which helps the sweater stay in place. This construction lets the garment drape smoothly over your body. You avoid awkward ridges and bumps because the seam follows your natural shape. The sleeve cap has a rounded, bulbous shape that matches the curve of your shoulder. You get a close fit that feels comfortable and looks neat.
|
Feature/Consideration |
Description |
|---|---|
|
Sleeve Cap Shape |
The cap has a rounded shape with slopes that match your shoulder. |
|
Ease and Movement |
You need the right amount of space so the sweater does not feel tight under your arm. |
|
Tailored Fit |
The seam lines up with your body, giving you a custom fit and a tidy look. |
You should remember that set-in sleeves work best for sweaters that need a close fit. The sleeve cap must fit into the armhole, so you sometimes add a little extra fabric to help it sit well. If you want a sleeve that hugs your arm, you angle the cap to avoid a boxy shape.
Pros and Cons
Set-in shoulders have many benefits, but you also face some challenges.
-
Pros:
-
You can shape each piece to match your own measurements.
-
The seams help the sweater stay in place as you move.
-
Cons:
-
You spend more time finishing because you sew the pieces together.
-
You cannot try on the sweater as you knit, so you might have fit problems.
-
You need to measure carefully and check your gauge for the best fit.
-
When to Use
You should choose set-in shoulders when you want a sweater with a neat, close fit. This style works well for cardigans, pullovers, and even lightweight tops. You can use both seamed and seamless methods. Seamed construction gives you strong, stable shoulders. Seamless patterns, like those worked from the top down, let you avoid sewing but still get a good fit if you follow the shaping instructions. Try classic patterns such as the “Felix Cardigan” or “Seamwork Astoria” for set-in sleeves. You will see how this construction gives your sweater a professional finish.
Drop Shoulder Explained
Features and Fit
You see the drop shoulder style in many modern sweaters. This construction creates a straight, boxy shape that feels relaxed on your body. The shoulder seam sits below your natural shoulder line, which gives you extra room in the upper arm. You usually knit the body as a wide rectangle, so the shoulder width matches the bust width. This makes the drop shoulder sweater look great when you want an oversized fit with lots of positive ease.
A drop shoulder sweater often has no shaping at the armholes or sleeves. You get a T-shape garment that is easy to knit and easy to wear. The sleeves attach to the straight edge of the body, which means you do not need to worry about complex curves. This style works well for beginners because you can focus on the fabric and design.
Tip: If you want a sweater that feels cozy and casual, try the drop shoulder construction.
Pros and Cons
You find many reasons to choose a drop shoulder sweater. Here are some of the main advantages and disadvantages:
|
Pros |
Cons |
|---|---|
|
Simple construction |
Can look bulky on some body types |
|
Beginner-friendly |
Less tailored fit |
|
Great for textured or colorwork yarns |
Extra fabric under the arms |
|
Allows for easy modifications |
May not suit all formal occasions |
You can knit a drop shoulder sweater from the top down or bottom up. Each method changes how you shape and assemble the pieces. In the top-down method, you cast on the full width of the shoulders and knit straight for the armhole depth. You then pick up stitches for the sleeves and neckband. In the bottom-up method, you knit the front and back separately, then join them at the shoulders before adding the sleeves.
Best Uses
You should use drop shoulder construction when you want a relaxed fit. This style works well for sweaters you wear while lounging or doing active things. You get more movement at the upper arm compared to set-in sleeves. Drop shoulder sweaters look stylish when you add positive ease to the body and keep the sleeves simple.
-
Choose drop shoulder for oversized pullovers and cozy cardigans.
-
Try this style if you want to show off textured stitches or bold colorwork.
-
Use drop shoulder construction for beginner projects or when you want a quick knit.
You can enjoy the comfort and style of a drop shoulder sweater in many situations. This design gives you freedom to move and a modern look that fits many wardrobes.
Saddle Shoulder Construction Guide
Key Characteristics
You see a unique look with saddle shoulder construction. This method uses a strip of knitting that runs from the neckline out to the edge of the shoulder. You knit this strip as part of the sleeve, and it sits on top of your shoulder. The saddle shoulder gives your sweater a strong line and a modern shape. You can choose between seamless and seamed options. In seamless saddle shoulder construction, you knit the body and sleeves together without sewing. In seamed versions, you knit the pieces separately and sew them at the end. Both methods create a neat finish, but seamless construction feels smoother on your skin.
Advantages and Drawbacks
You get many benefits from saddle shoulder construction. The strip on the shoulder adds strength and helps the sweater keep its shape. You see a smooth transition between the body and sleeves. This style works well for showing off yarn with different colors or textures. You can also adjust the fit easily by changing the width of the saddle. However, saddle shoulder construction can be tricky for beginners. You need to pay attention to shaping and stitch counts. Seamed versions take more time because you sew the pieces together. Seamless saddle shoulder construction is faster but requires careful planning.
Tip: Try seamless saddle shoulder construction if you want a comfortable sweater with fewer seams.
Ideal Projects
You find saddle shoulder construction in many types of sweaters. It works best for jumpers and pullovers that need a strong shoulder line. You can use worsted weight yarn to show off the shape and color changes. The table below shows a project idea that uses saddle shoulder construction:
|
Project Type |
Description |
Yarn Type |
|---|---|---|
|
Features a seamless transition between body and sleeves, ideal for showcasing varied yarn tones. |
Worsted (10ply) yarn |
You can look for patterns like the “Seamless Saddle Shoulder Pullover” or “Brooklyn Tweed’s Hugo” to try this style. Saddle shoulder construction gives you a sweater that fits well and looks sharp. You can use this method for both classic and modern designs.
Raglan and Yoke Styles
Raglan Features
You see the raglan sweater in many patterns because it gives you a comfortable fit and a modern look. The raglan shoulder starts at the neckline and runs in a straight line to the underarm. This shape lets you move your arms easily. You often knit a raglan sweater from the top down, so you can try it on as you go. You add stitches along the raglan lines, which makes the sweater grow in size.
A raglan sweater works well for both plain and textured designs. You can use simple stitch patterns or add stripes for interest. Many knitters like the raglan shoulder because it does not need much sewing. You join the sleeves and body together, then knit them as one piece. This method saves time and gives you a smooth finish.
-
The Nordic Yoke Sweater uses a top-down raglan design with stranded colorwork. You see crisp snowflake shapes because the colorwork stands out on the raglan lines.
-
The Aquarius Raglan uses many colors for contrast. You only use one color at a time in the stitch pattern, which makes the raglan sweater easy to knit and read.
Circular Yoke Features
A circular yoke covers the upper body, sleeves, and shoulders in one round piece. You knit the yoke in a circle, adding stitches at set points to shape the sweater. This style gives you a soft, rounded look at the shoulders. You do not see sharp lines like in a raglan sweater. The circular yoke feels smooth and comfortable, especially if you have sensitive skin.
You often see colorwork in yoke sweaters. The Dorthea Yoke Sweater shows how you can layer colors in a beautiful way. The yoke construction lets you add patterns and shapes that go all the way around the sweater. You can use this style to show off your favorite colors and designs.
Choosing Between Raglan and Yoke
You might wonder which style to choose for your next project. Both raglan and yoke sweaters have their strengths.
-
Choose a raglan sweater if you want a sporty look and easy movement. The raglan shoulder fits many body types and works well for beginners.
-
Pick a circular yoke if you love colorwork or want a seamless design. The yoke covers the upper body and lets you add bold patterns.
You can use both styles for textured stitches or simple knits. If you want to try stranded colorwork, both raglan and yoke sweaters give you space to play with color. The main difference is the shape at the shoulder and how the sweater fits your body.
Tip: Try both styles to see which one you like best. You can make a raglan sweater for everyday wear and a yoke sweater for special colorwork projects.
Full-Fashioned Shoulder Overview
Structure and Support
You notice a big difference in how a sweater fits when you use a full-fashioned shoulder. This construction anchors your sweater and gives it a strong shape. You knit the panels directly into the right shape, so you get clean edges and a smooth drape. The seams line up perfectly, which makes your sweater look neat and feel comfortable. You do not see bulky seams inside the garment. Instead, you feel a flat join that sits well on your shoulders.
-
Full-fashioned shoulder construction improves the fit and silhouette of your sweater.
-
You shape each panel as you knit, which gives you better control over the final look.
-
The linking method joins the panels with care, so you get a flat seam that does not rub or irritate your skin.
-
This technique helps your sweater keep its shape, even after many wears.
You can compare this method to a yoke construction. Both give you a smooth finish at the shoulders, but the full-fashioned shoulder adds more support. You see this in sweaters that need to hold their shape for a long time. The yoke style often focuses on decoration, while the full-fashioned shoulder focuses on structure.
When to Choose Full-Fashioned
You should pick a full-fashioned shoulder when you want a sweater that lasts. This construction works well for classic pullovers and cardigans. You see it in designs like the Adams pullover, where a good fit matters most. You also choose this method when you want a sweater that will not sag or stretch out. The full-fashioned shoulder gives you a stable base, just like a yoke supports the upper part of a sweater.
-
Choose full-fashioned shoulders for sweaters that need to keep their shape.
-
Use this method when you want a clean, professional finish.
-
Try it if you want to avoid bulky seams and enjoy a smooth fit.
You may notice that a yoke sweater feels soft and round, but a full-fashioned shoulder gives you more support. You can use both styles in your knitting projects, depending on the look and feel you want. If you want a sweater that combines the best of both worlds, try a design that uses a yoke with full-fashioned shoulder shaping.
Sleeve Silhouettes Constructions Quick View
When you knit a sweater, you can choose from many types of sleeves. Each style changes how your sweater looks and feels. You can use different sleeve construction methods to create unique shapes. Here is a quick guide to five popular sleeve silhouettes:
Balloon Sleeve
You see balloon sleeves with a wide, puffy shape that gathers at the wrist. The fullness starts at the upper arm and stays loose until the cuff. This style adds drama and volume to your sweater. You often use ribbing or a tight cuff to hold the shape.
Bishop Sleeve
You notice bishop sleeves have a gentle flare from the shoulder to the wrist. The fabric gathers into a fitted cuff. This style gives your sweater a soft, flowing look. You can use lightweight yarns for extra drape.
Puff Sleeve
You find puff sleeves with fullness at the top near the shoulder. The rest of the sleeve fits close to your arm. This style creates a playful and vintage feel. You can add small gathers or pleats for extra height at the shoulder.
Lantern Sleeve
You see lantern sleeves with a rounded, lantern-like shape. The sleeve widens in the middle and narrows at both the shoulder and wrist. This style stands out because of its bold silhouette. You can use this sleeve to make a statement piece.
Dolman (Batwing) Sleeve
You recognize dolman sleeves by their wide armholes and deep underarm curve. The sleeve and body form one piece. This style gives you lots of room to move. You often see dolman sleeves in relaxed or oversized sweaters.
Tip: Try different sleeves to see which style you like best. Each sleeve construction changes the fit and look of your sweater.
|
Sleeve Type |
Key Feature |
Best For |
|---|---|---|
|
Balloon |
Fullness at cuff |
Statement sweaters |
|
Bishop |
Flared, gathered at wrist |
Elegant, flowing looks |
|
Puff |
Full at shoulder |
Vintage or playful knits |
|
Lantern |
Wide in middle |
Bold, modern designs |
|
Dolman (Batwing) |
Deep armhole, loose fit |
Relaxed, comfy styles |
You can mix and match sleeves with different sweater bodies. When you understand sleeve construction, you can create sweaters that fit your style and comfort.
Quick Comparison: Balloon vs. Puff vs. Bell
You may wonder how balloon, puff, and bell sleeves change the look and feel of your sweater. Each sleeve style brings its own shape and personality. The table below shows the main characteristics of each type:
|
Sleeve Type |
Characteristics |
|---|---|
|
Balloon Sleeve |
Round, soft, inflated shape. Fullness from shoulder to cuff. Adds drama and femininity. |
|
Puff Sleeve |
Volume at the upper arm. Creates visual balance. Flattering for pear-shaped bodies. |
|
Bell Sleeve |
Flared shape that widens from shoulder or elbow to wrist. Adds movement and romance. Balances many body types. |
Balloon Sleeve at a Glance
You see balloon sleeves when you want a bold and dramatic look. The sleeve puffs out from the shoulder and stays full until it gathers at the wrist. This shape makes your sweater stand out. Balloon sleeves often appear in vintage-inspired designs. You can use them to add softness and a touch of femininity to your project.
-
Balloon sleeves work well for statement sweaters.
-
You can pair them with simple bodies to let the sleeves shine.
-
These sleeves suit both cozy and dressy knits.
Tip: Choose balloon sleeves if you want your sweater to look unique and eye-catching.
Puff Sleeve at a Glance
You notice puff sleeves by their fullness at the top near the shoulder. The rest of the sleeve fits closer to your arm. Puff sleeves add a playful and whimsical touch to your sweater. They give a bit of drama without being too much. You can wear puff sleeves for both casual and special occasions.
-
Puff sleeves flatter many body shapes, especially if you want to balance your upper body.
-
You can use them in both short and long sleeve designs.
-
Puff sleeves look great in lightweight yarns.
Tip: Try puff sleeves if you want a fun, vintage, or romantic style.
Bell Sleeve at a Glance
You spot bell sleeves by their flared shape. The sleeve widens from the shoulder or elbow and flows out to the wrist. Bell sleeves add movement and a soft, romantic feel to your sweater. They work well for many body types and bring a gentle elegance to your project.
-
Bell sleeves suit both simple and textured knits.
-
You can use them to add interest to plain sweaters.
-
Bell sleeves feel comfortable and allow easy movement.
Tip: Pick bell sleeves if you want a sweater with flow and a touch of drama.
In summary:
Balloon sleeves give you bold volume. Puff sleeves add playful height at the shoulder. Bell sleeves create a flowing, elegant line. You can choose the sleeve that matches your style and the look you want for your next knitwear project.
How to Knit a Sweater: Construction Methods
When you knit a sweater, you choose how to build it. The construction method changes how your project fits, looks, and feels. You can pick a method that matches your skill level and style.
Top-Down vs. Bottom-Up
You often see two main ways to knit a sweater: top-down and bottom-up. Each method has its own strengths. The table below shows how they compare:
|
Feature |
Top-Down Construction |
Bottom-Up Construction |
|---|---|---|
|
Ease of Trying On |
Easy to try on as you go |
Hard to try on until the end |
|
Seam Structure |
Usually seamless, less finishing work |
Great for seamed sweaters, adds stability |
|
Adjusting Length |
Simple to adjust body and sleeve length |
Easier to adjust neck and shoulder fit at the end |
|
Stability |
Less stable, may stretch over time |
More stable, seams add strength |
|
Portability |
Can get heavy as one piece |
Easy to carry in pieces |
If you want to knit a sweater that you can try on as you work, choose top-down. This method lets you check the fit and change the length. You can also knit a sweater with a top down saddle shoulder for a modern look. If you want more structure, try bottom-up. This method works well for classic styles, like a bottom up saddle shoulder.
Seamless vs. Seamed
You also decide if you want to knit a sweater with seams or without. Seamless sweaters look smooth and feel soft. Seamed sweaters give you extra strength and shape. The table below helps you compare:
|
Feature |
Seamless Construction |
Seamed Construction |
|---|---|---|
|
Durability |
Less stable, may stretch |
More durable, holds shape |
|
Appearance |
Sleek, no visible seams |
Visible seams, classic look |
If you want a sweater that feels light and modern, go seamless. You can knit a sweater in one piece, like a top down saddle shoulder. If you want a sweater that lasts, choose seamed construction. Seams help your sweater keep its shape.
Modifying Patterns
You can change patterns to fit your needs. When you knit a sweater, you might want to adjust the length, width, or shoulder style. Try these tips:
-
Measure yourself before you start.
-
Add or remove rows to change the body or sleeves.
-
Switch from set-in sleeves to raglan or saddle shoulders.
-
Use stitch markers to keep track of changes.
You can knit a sweater that fits you perfectly. Try new methods and mix styles to find what you like best.
Tip: Start with a simple pattern. Make small changes first. As you gain skill, you can create your own designs.
Choosing the Right Shoulder Construction
Factors to Consider
You want your sweater to fit well and look great. You need to think about a few key points before you pick a shoulder construction. Here are some things to keep in mind:
-
Think about the type of shoulder construction. You can choose from saddle shoulder, contiguous, set-in sleeves, or raglan.
-
Ask yourself if you want to try on your sweater as you knit. Some methods let you do this, while others do not.
-
Check if the shoulder length matches the design you want.
-
Look at the stitch patterns or design details. Some shoulders work better with simple stitches, while others show off complex patterns.
You can use these points to help you decide which style will work best for your project.
Comparing Styles
Each shoulder construction gives your sweater a different fit and look. You can see the main differences in the table below:
|
Shoulder Style |
Fit and Features |
Best For |
|---|---|---|
|
Saddle Shoulder |
Structured fit, may have baggy underarms if not sized right |
Sweaters that need strong lines |
|
Contiguous |
Lets you knit top-down and try on as you go, needs some skill |
Custom fits, advanced knitters |
|
Set-in Sleeves |
Stable, easy to change, but hard to try on while knitting |
Classic sweaters, beginners |
|
Raglan |
Roomy, easy to move in, seamless |
Casual wear, colorwork |
You can match the style to your skill level and the look you want.
Tips for Experimenting
You do not have to stick to one style. You can try new methods and see what works for you.
Tip: Start with a simple pattern. You can learn the basics before you try more complex shoulders.
-
Try top-down methods if you want to check the fit as you knit.
-
Use stitch markers to keep track of shaping.
-
Change the sleeve style to see how it changes the look.
-
Ask other knitters for advice or look for photos of finished sweaters.
You will learn more about what you like as you try new things. Each project helps you build your skills and find your favorite shoulder construction.
You now know how each shoulder construction changes the fit and style of your sweater. Set-in sleeves give you a classic look. Drop shoulders feel relaxed. Raglan and yoke styles add comfort and movement. Saddle and full-fashioned shoulders offer structure. Try new methods to see what works best for you. Understanding knitwear anatomy helps you make sweaters that fit well. Have you tried different shoulder styles? Share your thoughts or questions below!
FAQ
What is the most beginner-friendly shoulder style for sweaters?
You may find drop shoulders easiest. This style uses simple garment construction. You knit rectangles for the body and sleeves. You do not need to worry about armhole shaping. Drop shoulders work well for relaxed sweaters and let you focus on learning basic skills.
How does a yoke sweater fit compared to a raglan sweater construction?
A yoke sweater fits with a round, seamless upper body. You see smooth transitions from neck to sleeves. Raglan sweater construction uses diagonal lines from neck to armhole. Both styles give you a good range of movement, but yoke sweaters often feel softer at the shoulders.
Why do saddle shoulder sweaters look different from other styles?
Saddle shoulder sweaters have a unique strip of fabric running from the neck to the top of the arm. This detail creates a strong line across your shoulder. You see this feature in both pullovers and a saddle shoulder cardigan. The look stands out from other sweater types.
What is the purpose of armhole shaping in sweater patterns?
Armhole shaping helps your sweater fit your body. You use shaping to make the armhole match your shoulder and upper arm. Good armhole shaping lets you move your arms easily and keeps the sweater comfortable. You avoid tightness or sagging at the armhole.
Can I use saddle shoulder sweaters for active wear?
Yes, you can use saddle shoulder sweaters for active wear. The construction gives you extra support at the shoulder. You get a stable fit and a wide range of movement. Many people choose this style for outdoor sweaters and cardigans.